Popular topics: Multilogin X, Multilogin 6,
-
Retrieving the token Retrieving the automation token Retrieving profile, folder, and workspace IDs Retrieving the user ID Running Multilogin in a Docker container Setting up automatic cookie collection Selenium automation example Playwright automation example Puppeteer automation example Logging in to Multilogin automatically Auto-launching the agent Getting started with Postman Creating a profile with Postman Starting a profile with Postman Stopping a profile with Postman Updating a profile with Postman Creating a quick profile with Postman Automation FAQ
-
Error: Failed to get IP data: can't connect through proxy Error: Javax.crypto.badpaddingexception: pad block corrupted Status: Update in progress...Loading (1) of 2 components Unable to start Multilogin Unable to start a profile Error: Fingerprint composition failed Connection error due to non-Latin characters in Windows username Error: Mimic/Stealthfox executable is not found Error installing Multilogin on macOS Browser profile shows "Error" in status Common errors and solutions
 Multilogin X
 Multilogin 6
Creating a quick profile with Postman

Written by Soraya Paula
Updated on May 21st, 2024
Table of contents
Quick profiles are perfect for one-time tasks that don't require data saving. When you close a quick profile, it is automatically deleted along with all its data. The “POST Start Quick Profile” endpoint will help you launch multiple quick profiles.
Before you start
Complete all three steps from this article, including “Using the bearer token”: they will allow you to sign in correctly.
Running the script
- Navigate to the “Launcher V2“ section in your Postman workspace and select the “POST Start Quick Profile” endpoint
- Add proxy:
- Go to the “Body” tab
- Scroll down to find
flagsand setproxy_maskingtocustom - Add your proxy details into the
proxyparameter
- Fill in the values for
automationandheadless_modeparameters:-
automation: selenium/puppeteer/playwright (specifying this parameter will return the port for automation in the response) -
headless_mode: true/false
-
If you do not need to use automation or headless mode, you can untick these parameters from the start.
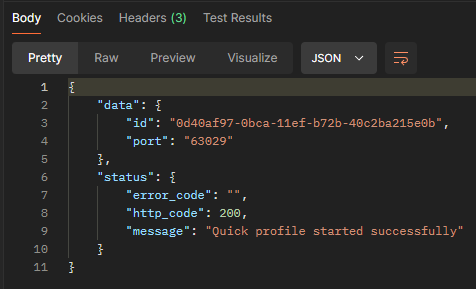
- Click “Send“ to execute the request: a “200“ status means success
In the response, you will also see the profile ID (id) and the port.
Script example
{
  "browser_type": "mimic",
  "os_type": "windows",
  "core_version": 124,
  "proxy": {
    "host": "<string>", #IP or HOST
    "type": "url", #HTTP or SOCKS5
    "port": "<integer>", #PORT
    "username": "<string>",
    "password": "<string>"
  }
  "parameters": {
    "fingerprint": {},
    "flags": {
      "audio_masking": "natural",
      "fonts_masking": "natural",
      "geolocation_masking": "custom",
      "geolocation_popup": "prompt",
      "graphics_masking": "natural",
      "graphics_noise": "natural",
      "localization_masking": "mask",
      "media_devices_masking": "mask",
      "navigator_masking": "mask",
      "ports_masking": "mask",
      "proxy_masking": "custom",
      "screen_masking": "natural",
      "timezone_masking": "mask",
      "webrtc_masking": "natural",
    }
  },
  "automation": "selenium",
  "is_headless": false
}